Figure 1
Windows 3.x users (Windows 95 users with custom telnet clients) must double-click the icon to start the telnet client program.
Main Page | Session 14 Index | Web Servers | Web Authoring Tools
This section covers deploying a web presentation with an ISP server. Setting up your web server is beyond the scope of this course.
Some ISP's have user accounts set up with the main directory already created and all you need to do is log in using FTP and upload your files, creating any required directories in the process. This is the simplest and is covered in section 2 of this document.
Other ISP's set users up with both an FTP and a Shell account, which requires access via telnet. Section 1 provides some basic detail for accessing your server space using a telnet client.
In order to use these steps, you must be connected to thhe internet and have a telnet client on your computer. Windows 95 comes with a built-in telnet client. For Windows 3.x users there are a variety of telnet client programs available as shareware.
Follow these steps to connect to your ISP and prepare your space for your presentation:

Figure 1
Windows 3.x users (Windows 95 users with custom telnet clients) must double-click the icon to start the telnet client program.
 Figure 2 |
||
|
||
 Figure 3 |
||
|
||

Figure 4
Here a few other commands to use during your telnet session to check for files in your directory:
| Command | Function |
|---|---|
| ls | Displays a list of all normal files in your directory |
| ls -a | Displays a list of all files in the directory |
| rm | Removes a file from the directory. Include the name of the file after the letters rm |
| mkdir | Creates a new directory. Not available on all servers. |
| rmdir | Removes a directory. Not available on all servers. |
This section is based on the non-commercial freeware version of WS_FTP client. Steps may vary with other software or other versions of this client.
Create a new profile and save it using the following steps:

Figure 5
Once connected, the directory window will be visible showing both the local and remote file systems. The current directory for each is displayed in the top box, with the directory tree in the next box, and the file list of the current directory in the bottom box.

Figure 6
The FTP client may be used to deleted files, create and remove directories and files as required.
Quit the ftp session and test out your work, live!
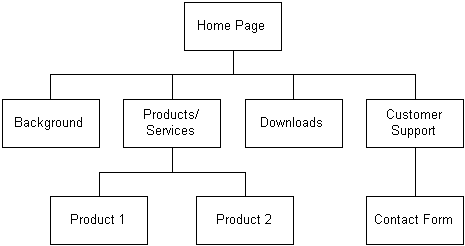
As individual web presentations and overall web sites grow in complexity, managing the HTML documents and related files becomes increasingly important. It is important to know where files are located and how they fit together, both for locating files easily to update pages and to insert new sections into a presentation or site.
Using a combination of a site map, similar to the map used during the design phase, and an actual directory structure for storing files helps simplify the task of managing and updating.
Here is a sample site map we will use for this demonstration:

Figure 7
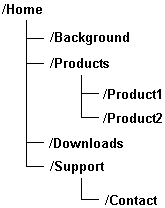
The HTML documents would be organized using directories which match the structure of the
site map, as illustrated in
 Figure 8 |
The HTML documents for each topic would be placed in the appropriate directory, and
the associated files (graphic images, sound files, map files, etc) would be stored
in one of the following methods.
|
Finally, keep a mirror (an exact copy) of your web site on your hard drive as your master copy. This is where you edit and test changes and additions prior to placing them online.
Don't forget to use the same format for file names in your local mirror as you do on the web server. This makes site maintenance much easier. Also, be sure to use relative references for all of the links within your site to easily allow for moving the presentation to another location.
| Directories used for organizing files in a large scale presentation. |

|
|
Top of Page |