Before you can actually make an image into an image map, you need to make one more modification to your HTML file. The last modification you need to make involves defining the areas to use as hot spots. This is done by using a MAP block.
The syntax for the MAP block is as follows:
<AREA SHAPE="shapetype" COORDS="top,left,..." HREF="http://nowhere.edu">
</MAP>
<MAP NAME="mapname">
Go ahead now and start the definition for the MAP block in your HTML file, "imagemap.html". To do this, put the lines with MAP and /MAP somewhere before the image tag in your document. Give the map the name "samplemap". If you put the MAP block after the image, it will not be able to find it. It may also make your code easier to follow if you put the MAP block before the BODY tag.
Click here to see an example of what your file should like so far.
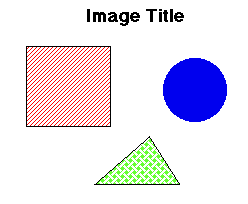
Now add an AREA tag for each of the objects. Put these AREA tags in the space between the MAP and /MAP tags. The choices for the shapetype are rect,circle,and poly. Use the follwing guide to define the COORDS:
rect => COORDS="top,left,bottom,right"
circle => COORDS="center row, center column, radius"
poly => COORDS="row 1, column 1, row 2, column 2,..."
For this tutorial, you can make the HREF field "box.html", "circle.html", and "triangle.html" for each of the respective objects.
When you create your own image map, you may want to set-up a default hot area for when the user clicks outside any of the objects. You can simply do this by defining a rectangular hot area for the entire image. The trick to this is to put this default AREA tag last in the MAP block. Why should you put it last? When two AREA's overlap, Netscape assigns a click to the AREA that was defined first. You want Netscape to respond to the default only if the click was not on an object. If you want the default click to do absolutely nothing, replace the HREF="..." with a NOHREF. Go ahead and add to your MAP block a default AREA that does nothing. (The lower right corner of the image has coordinates 248,204.)
If you are unsure of the syntax of the AREA's, click here to see an example of the document with the four AREA tags.
One more thing needs to be done before the image turns into an image map.
Inside the IMG tag, put USEMAP="#samplemap". This tells
Netscape to use the map named "samplemap", that is defined in the same
document (that's what the '#' is for) So, your IMG tag should now look
like this:
<IMG SRC="sample.gif" USEMAP="#samplemap">
You can also define your map (or maps) in a separate HTML file. Simply
insert the name of the document before the '#' in the USEMAP definition.
For example, your IMG tag may look like this:
<IMG SRC="sample.gif" USEMAP="mapfile.html#samplemap">
The image above has already been set-up as an image map. Move the
cursor over the image and notice that the bottom of the window shows HREF
locations instead of coordinates. This is one of the advantages of
client-side image maps - the user gets instant feedback from the image
map.
You have now defined a map to use for a particular image. If the destination locations existed already, you would be done. All that's left now, is to create the web pages for the links.


http://www.cgocable.net/~cassidyb/cis500/session9/tutorial/map.html